Windsurfing can be
expensive, but it doesn’t have to be. Where there’s a will to windsurf, there is a way… even if you’re a broke student, a starving artist, or an over-extended breadwinner. You just have to be smart about it, invest some time and effort, and be willing to make creative compromises. The following is my guide to windsurfing on the cheap. (You also might want to check this
basic info on windsurfing and
windsurfing technical questions guide.)
James’ Guide to Windsurfing on the Cheap1. ANY windsurfing is better than NO windsurfing. Don’t let the fact that you can’t afford new gear stop you from getting on the water somehow.
2. Get ready to do some experimenting and “tinkering” with your gear. Basically you are going to put together the windsurfing equivalent of Frankenstein’s monster, using used gear that no one else wanted. This will be an instructive and rewarding process. At the end you will have a better understanding of the equipment side of the sport than someone who gets everything new and complete from the store.

3. Secondhand gear is your friend. There are several ways to get it...
*Commandeer it from your aging or disinterested friends and relatives. There is a lot of perfectly functional windsurf gear collecting dust in people’s garages. More often than not, they’re happy to let it go for cheap or free.
*Get in the loop, locally. If you talk to and hang out with the windsurfers in your area, and join your local club if it exists, you will be the first to hear about good deals on used stuff. If you are a friendly, fun person who people want to sail with, they will often bend over backwards to help set you up with gear. Just be aware that serious windsurfers have sometimes forgotten what it’s like to be a poor newbie, and they may make snobby gear recommendations that are unrealistic for you and your situation.
*Scrounge at the shop. Unlike online dealers, real life windsurf shops often have lots of cheap, used gear. They may also host swap-meets at the beginning and end of the season, which can be a bonanza for savvy shoppers.
*Get in the loop, online. Sites like
iwindsurf have a classifieds ads section, and gear for sale will also often appear on regional windsurfing bulletin boards and email lists. If you shop for windsurfing gear on Craig's list or Ebay it can be helpful to ask in the iwindsurf forum if something is a good deal before you buy it, but be prepared for lots of differences of opinion.
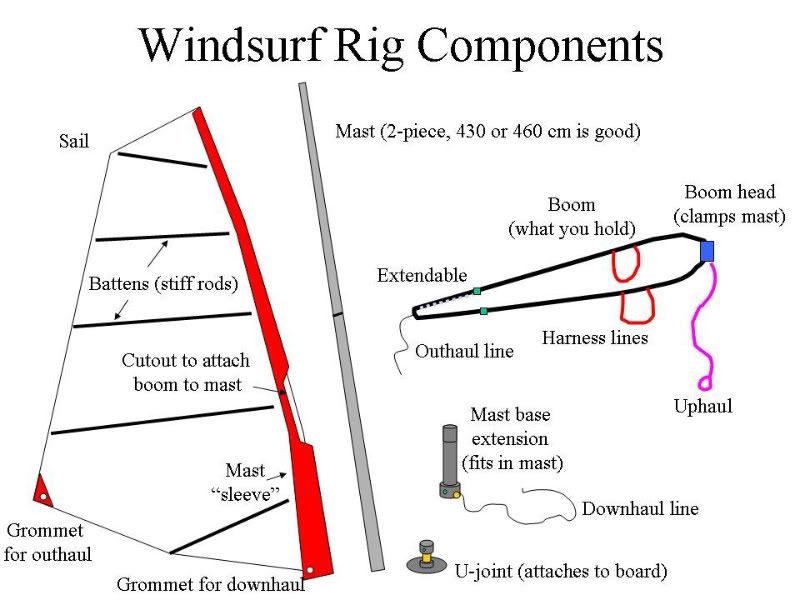
4. Figure out what you need. It’s useful to take a bottom-up approach and make a list of the ingredients required to assemble a working windsurf. You can base it on this diagram and list.
A board with plenty of volume for flotation. Consult my
windsurfing gear calculator if you’re unsure about what volume you need. A longboard (a large board with a daggerboard as well as a fin) is an ideal cheapskate’s board because it is usable in all wind conditions, is easy to progress on, and isn’t overly sensitive to the particular sizes of sails and fins that you use. As a beginner windsurfer you should generally avoid shortboards (those with no daggerboard), because they require more advanced skills, stronger wind, and specific sails and fins. If you do get a shortboard, prepare for a frustrating learning experience with lots of waiting for wind and struggling to get going.
 A universal joint
 that is compatible with the mast-track in your board. If you have an old longboard, it may have an odd mast track. Old, Mistral brand adjustable mast tracks often had an extra, threaded hole, making them compatible with modern single-bolt u-joints. Other mast tracks can sometimes be converted to a single-bolt system, although they may no longer be adjustable after the conversion. Ask at your local windsurf shop for help with this.
A mast-base extension that is compatible with your universal joint, has enough extension range to suit your mast and sail, and has robust pulleys and cleats for downhauling the sail. Buying a new aluminum mast-base extension and universal joint is usually a good investment even if your funds are scarce, because they are such a key part of your rig.
A mast that will fit the size and type of sail that you will use most often. Old fiberglass masts work ok with pre-1995 sails, but may be too fat at the tip to work in more modern sails. Newer masts (grey or black ones with carbon in them) work in both new and old sails and are lighter. A 460 cm mast is a good size for an average sized man, because it will work in sails from about 7.5 m2 (if it’s a new sail) to 5.5 m2 (if it’s an old sail). For a small guy or an average sized woman, a 430 cm mast is a good size, because it will work in sails from about 6.5 m2 (if it’s a new sail) to 4.5 m2 (if it’s an old sail).
A sail. Your bread and butter sail should be one that will get you planing on a good day. Later on you can add a larger sail for planing on marginal days, and a smaller sail for exceptionally windy days. In most areas, a “good day” means about 15 knots. So you can use 15 knots and the weight-appropriate sail indicated by the sail calculator to figure out what size sail to look for. If you are still working on the most basic skills like uphauling and tacking, then you may want to get a somewhat smaller sail.
A boom. You should get a clamp-on boom with a secure-feeling connection to the mast. It should have a large, robust clamp with a metal (not plastic) cleat in it. The size of the boom is dictated by the size of the sail. Your boom should be able to fit your bread and butter sail with a moderate amount of extension, leaving room for a larger or smaller sail if you add one later. A boom size range of about 170 – 220 cm is good to start with.
5. Develop a discriminating eye for gear and a sense of how much it’s worth.
*Some stuff isn’t worth the trouble, even if it’s free. In this category are: 1) Fiberglass masts that look “fuzzy” on the outside where the itchy glass fibers are exposed. 2) Boards with grievous damage, or missing, non-standard components that you don’t have the time or skill to deal with. 3) Tie-on booms, one-piece masts, and simple, triangular sails (unless they come as part of a complete, antique rig in excellent condition). 4) Colored plastic downhaul tools, which will split in your hand and cut it open.
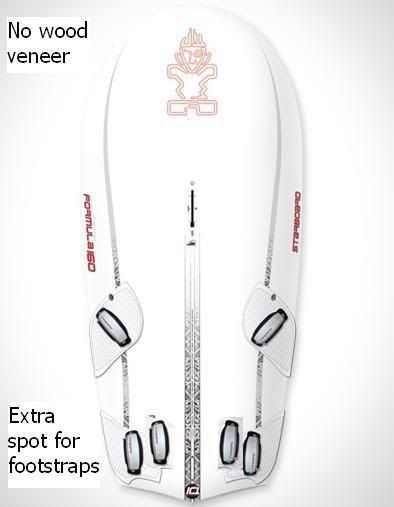
*Some stuff is better than nothing, but may have compatibility and performance issues. Pretty much anything from the early 1990s or earlier falls into this category, and you shouldn’t pay more than a few tens of dollars for it, at most. Sails from this era can be recognized by being made largely of laminated cloth with bold colors. Boards from this era often had heavy plastic construction and rear footstraps on the centerline of the board. There were also a lot of longboards from this time that had daggerboards, but were stingy with width and volume, and thus were almost as hard to ride as shortboards, especially for full-sized dudes. These boards had anywhere from 140 – 180 liters volume and were about 300 – 340 cm in length.
6. Learn how to make minor repairs and improvisations.
*The most common windsurfing repair is taping over small tears in the clear plastic part of monofilm sails. As long as a rip isn’t too big, and doesn’t go all the way to a cloth seam on the sail, you can carefully clean and dry the area around it and put tape over it on both sides to fix it. The best type of tape to use is specialized clear sail tape that you buy at the windsurf shop. If you can’t afford that, regular packing tape works ok, and black “Gorilla Tape” works great if you don’t mind the looks. Grey duct tape degrades in the sun and isn’t so good.
*Dings in a board can be repaired with a stick of “plumber’s epoxy”, which is sometimes marketed at windsurf shops as a “ding stick”. It’s the same thing as plumber’s epoxy, just more expensive. It’s a
clay-like substance that hardens in about an hour. If you make a lot of repairs with it, it will look like your board is covered with wads of chewed gum. If you don’t like the looks, you can sand the wads flat and paint over them.
*Regular epoxy can also be used for some repairs. There’s a whole art to board repair that I won’t get into here. If you want to learn more, check out the instructions on the
Windance Website or visit the “
Board Lady” Eva-M Hollmann.
*Lots of times old longboards are in perfect shape except for a rotted or torn daggerboard gasket. You can sail them without fixing the gasket, but they will be slower and water may shoot up through the opening. Your local windsurfing shop might be able to help you order a new gasket, or you try to find one online, or you could make your own. The cheapest way to make your own is with Gorilla tape. Lay two pieces out sticky side up, parallel, and overlapping slightly. Then lay one piece sticky side down over the seam between the other two pieces. Stick the tape down over the daggerboard slot and voila – instant gasket, quality not guaranteed.
7. Make your car work for you; don’t work for you car.
*If you are poor, the last thing you need is a new car with big monthly payments. Go for a cheap car, since it’s going to be messed up anyway by your nasty windsurfing gear. Station wagons are nice since they can easily accommodate roof racks on top and sails, booms, and masts inside. Your car can also double as your permanent windsurfing gear storage area. Since you’re sailing old, ugly gear, it’s ok to leave it outside on your car all the time, unless you live in a particularly desperate, high crime area.
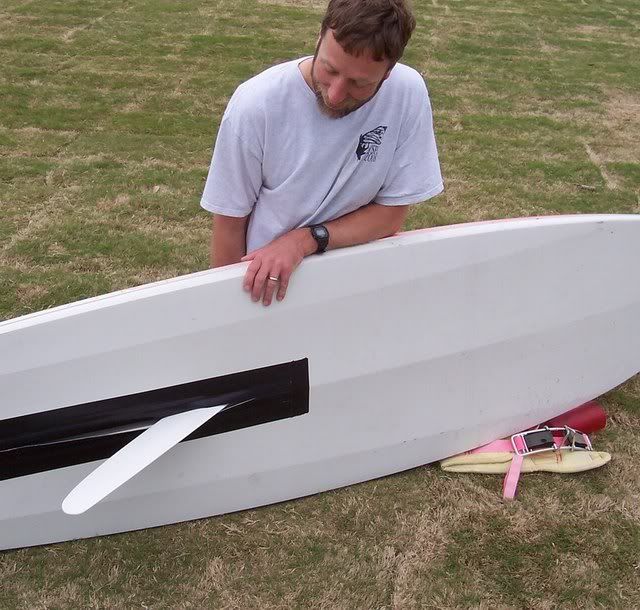
*Roof racks can be expensive, but if you’re lucky, you can find some for your model of car on eBay or Craig’s List. If you’re handy, you can make your own. In a pinch, you can even strap a board to your roof without any racks. Just roll up some towels as pads, put the board upside down on top of them, and run straps through the tops of the doorways in the car (see picture). You’ll be fine unless it rains hard.
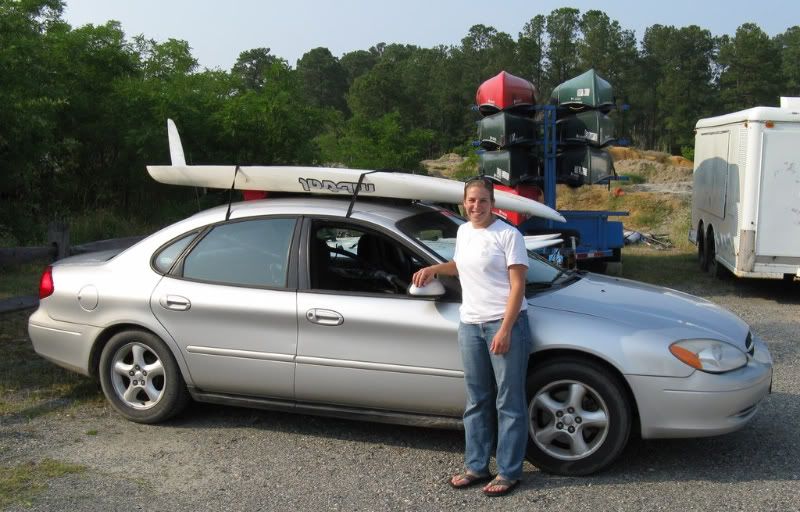
*For straps, it’s worth the investment in
real surf straps. Straps with hooks or bulky ratchets, the type you are most likely to find at the hardware store, are meant for boat trailers and pickup beds, and are inconvenient for regular roof racks. Make sure the straps you get are long enough but not too long.
8. Make windsurfing number one.
You may think windsurfing is expensive now, while you are first starting. However, as you get more addicted you will find that windsurfing becomes more fun than almost everything else in your life, and it will seem perfectly natural to spend a large portion of your income on it. You will have no qualms about economizing in other areas to maximize your windsurfing. For instance, you can probably cancel your cable, sell your video game console system, cut down on your drinking, moderate the air conditioning, etc. If you are a single man you can decide to only go out with modern, liberated women who don’t mind going Dutch on dates. If you are a single woman, you can decide to only go out with traditional gentlemen who pay for everything. You’ll figure it out.


